
Materials for each card: one sheet of construction paper, two or three pieces of clear Contact paper (each about 6" wide and no more than 8" long), and things to stick to the Contact paper (sequins, glitter, leaves, photos, stickers, pieces of colored paper, petals - pretty much anything that's pretty flat will work)
- Take a sheet of construction paper or printer paper (or fancy cardstock, whatever you have) and fold it in half so that you have a 8 1/2" x 5 1/2" rectangle.
- Cut a window in the front of the card. You don't want it to be too large, or there won't be any room left to write inside the card, because the inside of the card is going to show through the window.
- Cut two pieces of contact paper so that each is at least 1" wider and 1" taller than the window you just cut in the card.
- Open the card up and lay it on your work surface so that the outside of the card is facing up.
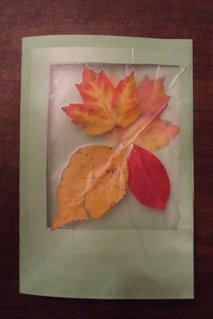
- Now arrange your decorations in the window of the card. You may want to save a few decorations to stick to the inside of the card later on to give it a 3-D effect. Some of the decorations may be attracted to the Contact paper via static electricity as you're putting it on, so be try not to make the design too finicky, or you'll end up repositioning a lot of the decorations.
- With the decorations arranged in the window, peel the backing off of one piece of Contact paper and stick it to the front of the card so that it overlaps the window by about 1/2" on all sides. Press down on the decorations to stick them firmly to the Contact paper.
- Pull the card away from the table - hopefully the decorations should stick, while the table doesn't. Reposition any decorations that fell off.
- Now open the card to the inside and stick a second piece of Contact paper over the first, again overlapping the sides of the window.
- If you saved a few decorations, scatter them on the inside of the card and cover them with an additional piece of Contact paper.
- Write your message, and you're done!


This size of card is great for giving to people in person, but you may want to start with a smaller card size if you're planning to mail it. Otherwise, you can do what I did with this one - fold it in thirds and stick it in a business envelope :)
No comments:
Post a Comment